What is Halloween without some green spooky slime? Found this great easy recipehttp://play.powerhousemuseum.com/makedo/slime.phpAdded some plastic spiders,flies,and eyeballs and kept in the fridge over night for a cool slimy sensory play tub The slime is a great consistency that you can spend hours exploring
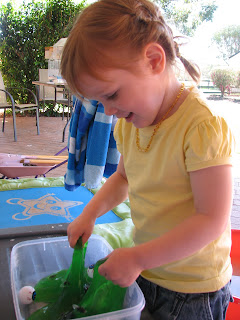 This is best suited for children who wont try to eat it but an alternative option for toddlers would be green jelly made to instructions on packet, set in the fridge then squeeze through fingers to loosen up.
The amount of wastage that is in packaging these days its nice to use materials that lessen the impact on our environment. Instead of throwing out your boxes from cereal, cut them into strips then into squares. You will be amazed at the different colour varieties you get. For younger children draw up a sheet of paper with squares marked out already for them in which they can paste and place the cardboard squares into. For older children they will enjoy using their own template to make their own mosaic picture.
On a orange piece of paper i drew an outline of a ghost which Tara glued inside the lines and added googly eyes on top of the dots Then she covered the ghost with cotton wool balls to make a very scary ghost picture
These super cute pumpkin paper plate mask templates are found at http://www.dltk-holidays.com/halloween/mepumpkin.html
While daddy was at work we found his pencils and decided to decorate them and surprise him with a pencil pet!With some feathers as hair stuck on by twisting a pipe cleaner around the pencil, finished off with googly eyes, a pom pom nose and sticker mouth-they looked very cute! You could replace the face features with whatever you have around the house to give each pencil its own unique look
Our property is certainly showing signs of spring time! We have had 5 baby quails hatch recently and they are Tara's favourite pass time. Catching those quick quails is a challenge but she has now mastered it and loves giving them a pat Good practice for being gentle when her baby brother comes along!
We explored our local forest for a springtime "Fairies and Elves" bushwalk and here is my little Fairy ready for a day that didn't turn out as planned! Had a fantastic time investigating the wood theme table
 And our bush walk began...This was just before that little hand got bitten by the biggest bull ant i have ever seen, poor little poppet wasn't happy
This stunning spring weather has kept us outside most days and what better than exploring in a sensory tub full of nature. I started off with a beach type area with sand,pebbles and water filled with her stretchy frogs and lizards and let her add whatever she wanted The tub quickly turned into a "muddy mud puddle" filled with sticks, leaves, cuttlefish and shells but was enjoyed for hours!
With spring here we have made the most of it by getting into the sunshine. We decided to this year add a herb garden to our vegetable patch so i labeled the pots and Tara matched the packet of herbs to their pots. Great for letter and word recognition. Its amazing how the outdoors can bring out so many more learning opportunities and the simple things like filling up pots can turn into lessons about "empty" "half" and "full"
These spray bottles were filled with 1/2 water 1/2 poster paint to make a lovely runny consistency perfect for spraying from bottles. Great for little hand muscles and so much fun! Great to store for gift wrapping paper. For older children using a white wax candle you can write a secret message or picture before starting and as you spray your paper the hidden message will appear
This was an activity i thought up after many days of constant rain and being stuck inside. It was done in our kitchen but it could be adapted to anywhere using cardboard squares inside or some chalk outside.Using a whiteboard marker to mark out numbers 1 to 10 length ways in order but in a scattered pattern and then used extra numbers on either side of them. Sorry the photo didnt pick up numbers very well.. Tara started at one side of the "bridge" and had to find her way across the bridge by stepping on the correct number order. She found 1 on the first row then found 2 on the second row etc
 Made it all the way across the bridge to 10 to finish off crossing it. She then asked me to help her do it backwards like a countdown.It stayed on our kitchen floor for a few days and got a good work out. Easy to wipe off and got us out from behind the desk. Lots of fun!
After Tara realised some of her pet rocks were in need of repairs we got out our stash of googly eyes and were looking at the different sizes. It was Tara that surprised me with her knowledge of "medium" so we went on to sort "small "medium" and "large" eyes into little cups. It goes to show that our children really are listening to every word we speak. Though i have never explained to her what medium was she had heard it and worked it out herself.
At 30 months Tara had given up her afternoon nap and was struggling through the afternoon only to liven up when daddy arrived home at 5pm so i found we needed a relaxing playtime with daddy after dinner to wind down before bedtime. I made our usual batch of play dough but added a calming blend of oils instead of vegetable oil in the mix. I used a specially made children's calming mix that i used in our oil burner when Tara was a newborn, its found athttp://http://shop.newdirections.com.au/epages/newdirections.sf/en_AU/?ObjectPath=/Shops/newdirections/Categories/12/118/1310 Relaxing, educational and even daddy can wind down after a hard day with this activity!

 The slime is a great consistency that you can spend hours exploring
 This is best suited for children who wont try to eat it but an alternative option for toddlers would be green jelly made to instructions on packet, set in the fridge then squeeze through fingers to loosen up.


